Most DAWs come with built in FX, of course, REAPER is no exception. With ReaPlugs FX suite, it has massive functionality from the first opening of the software. Also available for free download, if you use other software, these plugins are possibly the best for learning production and mixing. Their basic user interfaces, while not the prettiest, are essential for learners and people looking for quick manipulation of the effects. My opinion is, if you master using these plugins, all others will be easy.
What REAPER has managed so well with it’s plugins, is raw power. Just look across forums and you will see people testifying for their use over paid and professional plugins. While they don’t have every bell and whistle, you can rest assured as a beginner, or a master, there is room in your chain for a ReaPlug. You can get entirely professional sounding mixes exclusively with free VSTs, something which would be made significantly harder without this plugin suite.
ReaEQ
(Parts taken from previous post.) ReaEQ is probably my favourite plugin in the suite. It gives unlimited band control over your mix. There are few limitations to this plugin and many people including myself adopt it as their go to EQ plugin. It has a simple interface with deep functionality to also be explored. It’s fantastic frequency analyser lets you identify problem frequencies in real time when playing the track and using it takes seconds to get the desired sound.
Let’s first of all look how to open it:
Each track has a green (or grey if no other effects are activated) FX button that allows you to add any FX to the track (this is also the button to hit to select VST instruments). Select the FX button on the track you want to equalise.
This will open the selection of plugins and effects you can use. If you can’t find ReaEq, type it into the search and ensure All Plugins is selected. The view will be different for each person depending on what plugins they have downloaded.
You will now have ReaEQ up. Let’s take a look at the features and how to EQ. The first view is a black background with the frequencies along the bottom. If you play your music with the EQ enabled, you will see a yellow line running along the visual part of the plugin. The height of the line represents the volume of that particular frequency.
Let’s make some adjustments. If you look at the picture above, there are four circles, each numbered. These are Bands. They are just the points with which we can make adjustments. Band 1 and Band 4 are ‘Shelf’ filters. These can be used at each end, cutting off any frequency beyond the the far ends of the frequency spectrum. Imagine book-stops, there are no books on the outside, all are enclosed between the book-stops. This is a good technique to practice with all your mixes. The human ear hears between 20-20,000 Hz so anything outwith those frequencies is just wasted sound and therefore wasted energy in the mix. A point to bear in mind is what notes are needed, if you are EQing a guitar, look for the lowest note of the guitar (usually E 82.41 Hz) and anything below that is un-needed noise so just set your shelf to roll off at 82.41Hz. It works differently for the high frequencies as instruments have harmonics so be careful if you want to preserve them, also, higher frequency notes hold less energy so take up less headroom anyway.
We can look at bands 2 and 3 now. These, if you look at ‘Type‘ are ‘Band’ Bands (sorry if that’s confusing). If you click and drag around these points, they will boost and cut the frequencies. The blue line represents how much each frequency is boosted. This can also be controlled by the Frequency and Gain faders on screen.
The last point is helpful if you want to boost a broad spectrum of frequencies but what if there is just one specific frequency you want to cut? This is where the bandwidth comes in handy. It controls how wide the boost or cut is. The numerical value is measured in octaves so if you want a narrow band cut out, it’s probable going to be a number below 1. If you are looking for a rogue frequency or one you hate/want to boost, my advice (as well as peoples’ who are good at this stuff) is to get a very narrow bandwidth and boost the band, then sweep it across every frequency (which boosts every frequency) until you identify the on you want to adjust. From here you just make vertical adjustments to taste.
You are not limited to four bands. At the bottom is an ‘Add Band’ selection where you can add as many as you like. Each can be a different type of band and each can be a different bandwidth. The above picture shows multiple bands boosting the bass and the highs while cutting a lot of the mids. This is perhaps a low frequency instrument with the mids cut to make room for the vocals or other mid range instrument.
There are also tonnes of presets which I recommend if you can’t get a start on it. Try out all the presets you want and see how it changes the sound. See what frequency does what, edit the presets accordingly to your own particular sound, they are there to be used as templates to get you started.
My main advice is that since EQ adjusts the volume, you don’t want to do too much boosting as this may take the sound into the red if it is already too loud. The best thing to do is cut the bad frequencies and then adjust the volume up if necessary.
Compressors are a big consideration with EQ, try compressing both before and after the EQ and see what the difference is, different people recommend different things but I have never settled for one right way, simply put, the right way is the way that sounds best.
ReaComp
This is one of the best compressors out there. It provides visual feedback for both input signals, output and how much the compressor is kicking in. It is one of the most transparent compressors that I’ve used and certainly the easiest. It has the full range of ability, allowing limiting, parallel compression, as well as side-chain compression and basic compression. It will suite 99% of your compression needs and I only stray away from it if I want a less transparent compressor or multi-band compression.
So let’s open it up:
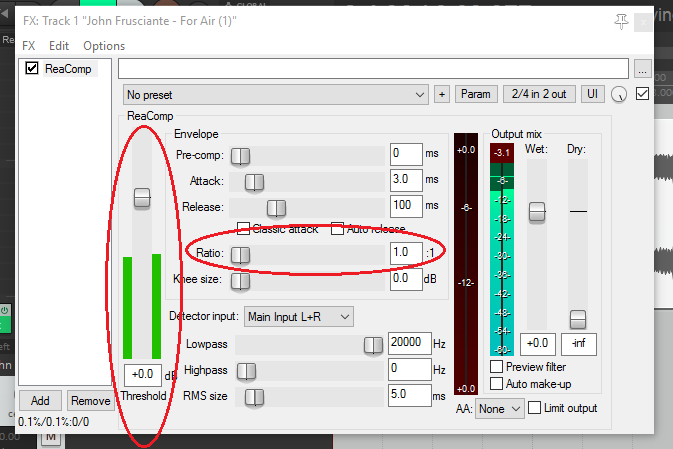
Just click the FX button, like above. You can type in ReaComp and it will find it. You will be faced with this:
This looks quite daunting at first, and if you want to just get started immediately, there are plenty of good presets already built in. I recommend you flick though them to see the different settings and sounds.
Now you can start playing your track. I want you to look at two key parameters first. They are the threshold and the ratio. If you are getting started, I recommend you just play with them first as they are the main two controls of a compressor.
If your track is playing, you will see the green bars moving up and down on either side of your threshold control. These represent the levels of the left and right channels going into the compressor. Move the threshold fader down, below where the green lines peak. Every time the green lines go above the threshold fader, that sound will be compressed at the ratio selected.
Of course the ratio hasn’t yet been turned up and so the track won’t be compressed yet. I have turned the ratio up to just below 3:1. Now any time the volume exceeds the threshold, the music will be compressed by that ratio.
The red meter on the right of the controls shows by how much the signal is getting compressed. As you can see the volume is currently exceeding the threshold, and the peaks are getting turned down by roughly 5dB (the red lines fall between -4dB and -6dB reduction on the meter).
That is the most basic compression. You can now alter the attack and release times for better control. Likewise with the knee size, depending how hard you want it to kick in.
By selecting the input, you can allow for side-chain compression too, click here for a more detailed guide on getting side-chain compression.
Now let’s look at some of the other controls, low-passing and high-passing the detector is worth doing if you don’t want the bass or high frequencies to trigger the compressor, say if you only want it to kick in when the mids are prominent, or by dropping the low pass all the way down, you will only compress when the bass frequencies exceed the threshold.
Likewise below that, you can set your RMS size for the detector, a feature I admittedly don’t use. Looking over to the right hand side, you have controls for the wet and dry. By default the compressor is set to 100% wet so only the compressed signal goes through, but in the case of parallel compression, you will want to mix the dry and wet levels for a beefier sound.
Play around with auto make-up if you want to bring the level back up again. The other controls can be left for you to discover (for the sake of brevity). The main point of this compressor however have already been covered.