If there is one effect that is more important to nail than the rest, it would be EQ. By mastering the use of an EQ, you will have an incredible control over your mix. EQ has been used for a long time and its use, as both a creative and a repair tool, has merited it’s place on pretty much every recorded track ever. Here are some tricks which will help you use an EQ plugin to its fullest.
1. Open Up an EQ on Every Track
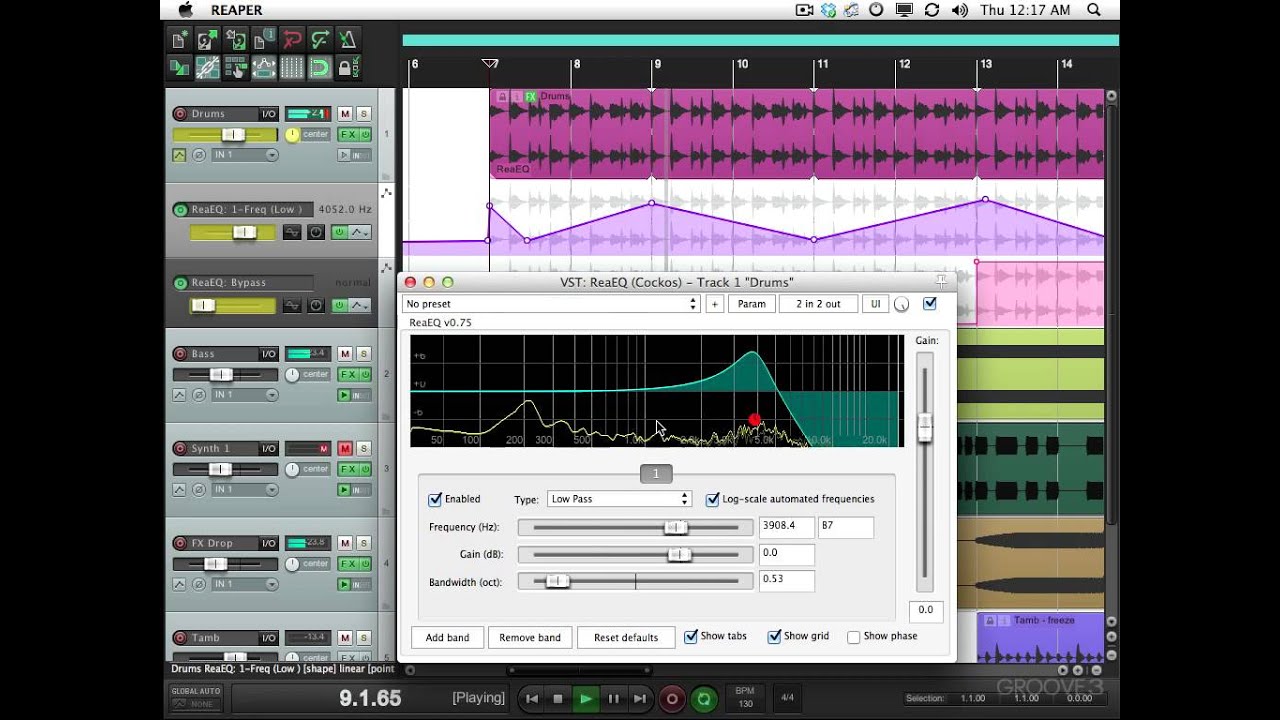
Unless processing power is a massive issue, there are several benefits to having an EQ set on each track. Even if the track itself doesn’t have any need of EQ’ing, the benefits are still present. For instance, many EQs have a real time analyser built in them which allow you to view the intensity of each frequency. This is really useful if you want to see what frequencies are taken up and where.
If you want to make room for a certain instrument, you will need to see it’s main frequencies. This could be done on any analyser, but each one will use a different scale. You may as well stick to the same scale and put the EQ on both tracks. Like in the image above, you can see exactly where the peaks of one track are and so it is easy to dip those exact points in the EQ of another track. Finally, if you plan on using EQ on every track, it makes sense to set them for when you need them. Especially if you are going to…
2. High-pass Everything
Humans have a limited bandwidth of hearing (20Hz-20kHz). There is no point reproducing sound out with that band of hearing as it will be unheard, yet take up headroom. Bass frequencies especially take a lot of headroom, so it is important to have control over them, and remove them where possible.
Every instrument has a lowest note, think of a guitar, it’s lowest note is the open E string. When a microphone records an instrument, it records every sound, including background and room noise. There is no point having these sounds and so, if any are below the pitch of the instrument, we can remove them.
Let’s keep the guitar example. It’s lowest note is E or 82.41Hz (we know this from a quick Google search). From this information, we can safely say that every sound picked up below that frequency is unwanted noise.
So this means we can remove everything below this frequency. A high-pass filter (which only lets the high frequencies “pass” through) is used and is set just below the frequency needed. In this case, I’d set the high-pass just below 80Hz, removing all of the sound below the guitars’s lowest pitch.
If you don’t know the lowest frequency, perhaps because it’s a singer, set a high-pass and move it up in frequency until you hear it affecting the quality of the voice. Bring it back down just below that threshold and you have the right frequency. Make sure to do it on a part where the full range of their voice is used.
Should you decide to have a sound that goes super “subby” and low frequency, remember the limit of human hearing is 20Hz and most good speakers can struggle below ~30Hz. So there is no point having anything less than 20Hz, and you will hear little difference even at 30Hz. You can safely high-pass that frequency on each track. I do it for all tracks just to get the absolute best amount of headroom.
Just bear in mind headphones do go down to 20Hz but in my honest opinion, there is very little musical value at that frequency.
Remember, in the context of a busy mix, you can remove more than you think. Don’t just make your judgement on a solo’ed instrument as taking that little bit extra out may sound better when everything is playing at once.
3. Sandwich a Compressor Between EQs
EQ or compressor first? To be or not to be? These are the two questions laid out by Shakespeare. Only one survived in popular culture however, but us audio nerds remember the former. Firstly the real answer is it doesn’t matter as long as you are happy with the sound, secondly save yourself some trouble and just sandwich a compressor between the EQ.
I do have actual reasoning behind this, it isn’t just a noob shortcut. The reason being, depending on the order, the sound of the EQ and Compressor has very different qualities.
A technically accurate representation
of a tasty signal chain
As a rule, I like to have the frequency content of a sound nailed before I compress it. But, the nature of compression means it brings the volume up. This could be the volume of a harsh air in a reverb tail, that wasn’t an issue before the compression.
This is why I like to do the surgical EQ prior to compression and then a much more broad and general “polish” post compression IF NEED BE! Tweaks post compression should not be more than a couple of dB as it can ruin the work done by the compressor, especially if you are dealing with a peaking track.
The first EQ does the hard work. Second does the polishing up.
4. Ring out the Frequencies
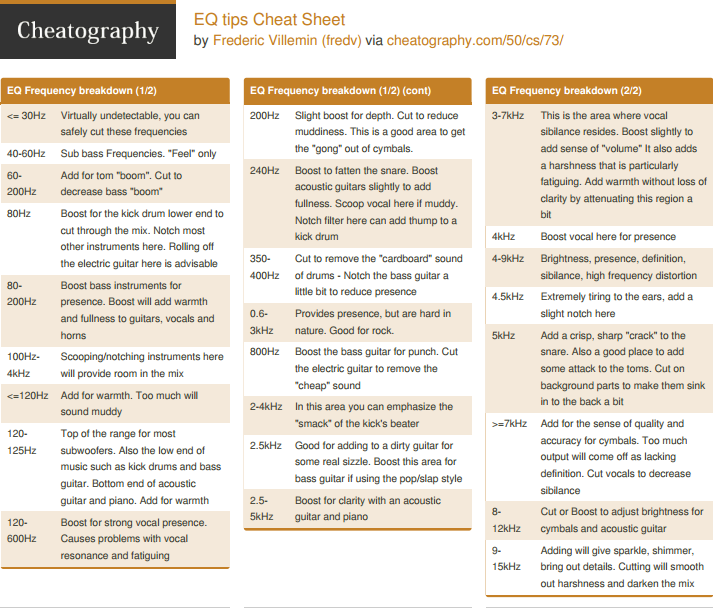
Struggling to know what frequencies are causing you issues? Well first have a little look at and EQ cheat sheet:
Once you have done that and realise that you want to actually learn how to do it, follow these steps:
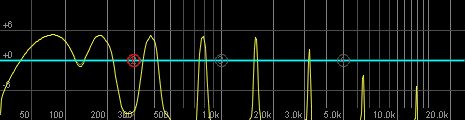
Firstly, you want to grab a band on your EQ plugin and give it a narrow Q (bandwidth) this means that any boost will only affect that frequency and the ones nearest it. Bring the gain up on that band and slowly sweep it up in frequency.
Circled in red is the band and the narrow
bandwidth settings
As you sweep up the frequency ranges, you will hear some harsh frequencies. These are the ones to focus on first. Bring them down a few dB and make a new band with the same settings. Rinse and repeat until you have tamed all the nasty noises. A few things to look out for are the frequencies which hurt, the ones that make the voice sound like it’s going through a phone, the sudden resonances (often heard in female vocals), and anything that muddies up the mix. Remember you don’t have to mute these frequencies, as the reason they hurt is because you turned them up in the first place. But if your song is destined to be played in a loud venue, they are the frequencies you want to be turned down. Not every frequency has to be turned down. In fact I like to do the opposite too where instead of boosting frequencies and sweeping, I remove them and sweep.
This shows which frequencies are really necessary for the body of the sound. And once you’ve identified them, try boosting and seeing whether it improves the sound. I like to make it a loose rule that you should always subtract bands the same amount or more than you boost them. That way you aren’t adding a ton of gain as you go through your signal chain.
5. Automate the EQ
Automation is essential in changing sounds. Let’s say you are editing a speech where the person has bad mic technique. They may be moving the mic towards their mouth and then suddenly away. This leads to the proximity effect which can suddenly add a lot of bass to just that section of audio.
Obviously an EQ curve that constantly removes bass may mean that the rest of the time the voice sounds thin. Automate that band to only dip the frequency when it gets bassy and you won’t have the issue.
Another trick with automating EQ is to set a rising frequency of a boosted band. This can create a dance riser effect as the intensity goes up in frequency, much like the effect here.
Other automation tricks would be to dip the bass every time the kick plays, much like a side-chain compressor.